A simple picture frame that I used to wrap a painting done by Nancy’s mom.
 To get some practice with the table saw and the router I decided to create a frame using a piece of scrap 2×4. I used a Roman Ogee bit in the router to create the contour and the table saw to square up and cut the frame to the required width (Sorry no pictures, didn’t have the camera). I also used the table saw to create the miter joints and to create a slot in the bottom of each frame piece to hold a back that would be used to support the painting.
Glue up
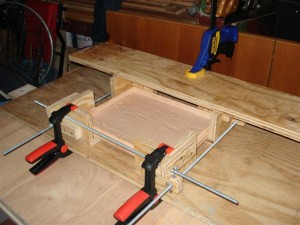
When trying to glue up the frames I realized that I didn’t have any kind of jig to support the frame and keep the joints tight as it dried (I also haven’t acquired a brad nailer yet). So I put the frame aside and designed and created the picture frame jig. With the new jig I was very easily able to glue up the frame pieces.
The frame glued up great using the new jig. I had some trouble removing the frame from the jig because of glue seepage, but was able to do it without damaging the frame. I choose an ebony stain for the frame. I’m not too happy with the result. I had some problems with the drying because I tried to do this in the garage, but it was way too cold. So I moved the piece into the furnace room to dry. I used steel wool on the finish after the first coat, and applied the second with a brush (I used a rag with the first coat) and made sure I wiped off all the excess. The second coat looks better, but I’ll have to work on my finishing techniques before the next project. 
Here’s a shot of the complete frame with the artwork added. It hangs in my home office.

Completed Picture Frame
Add Comment
You must be logged in to post a comment.