I’ve been asked by a few viewers to provide some more details of my backyard horseshoe pit design so tonight I took some time to enhance the sketchup model some and provide a couple of shots which include dimensions.
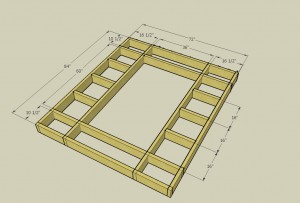
The first step in building the pits is to create the base. This is made from pressure treated 2″x6″ lumber as shown in the following diagram. I used 3″ exterior decking screws to secure the individual base pieces. (Click on the diagrams for a larger image).
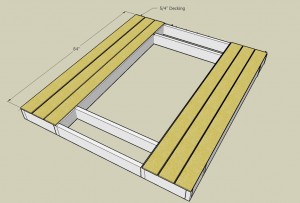
Next the long side decking is added. Three 7 foot sections of 5/4″ decking are used for each side. Adjust the gaps between the boards so the three boards space the area that will become the throwing walkway. For the inside boards on each side I left a ridge on the support base (about 3/4″) showing so that it could be used to support the screens over the pit area.
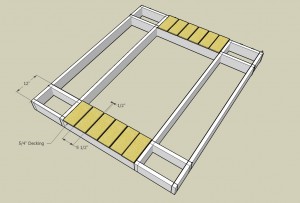
Next the shorter decking pieces are added to the front and back of the base structure again leaving a small area of the base structure that outlines the pit area exposed to support the screens. I used normal exterior decking screws to secure all decking.
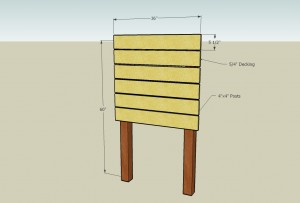
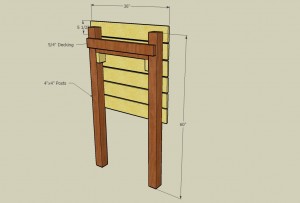
The backboard is a standalone piece that is comprised of 4″x4″ pressure treated posts and 5/4″ decking. The beverage holder is created using 2″x4″ pressure treated lumber. I created the complete backboard assembly, then drove the 4×4 posts into the ground behind the platform. Rather than using cement to secure the posts in the ground I decided to bolt the 4×4 posts to the base structure using 4″ lag bolts. I had to remove two of the short back pieces of decking temporarily in order to drive the lag bolts from the inside of the base structure.
After the horseshoe pit assemblies where set in the ground and leveled I buried a 5 gallon bucket in the pit area to support the cemented spikes. I then covered the inside of the base structure with landscaping fabric before adding the sand to prevent weed growth.
So far after over a year the pits have held up well (except for the corner of one of them that my wife took out with the lawn tractor). If you have any comments or questions on the design feel free to leave a reply.
There are detailed high quality woodworking plans available in the download store for the horseshoe pits. The plans contain 20 pages of step-by-step instructions, a material list, and detailed diagrams so that anyone with basic woodworking or carpentry knowledge can create their own set of horseshoe pits like these!


These pits are great. I used the diagrams to begin building them today, and they are very easy to do! I am planning on finishing tomorrow and I can not wait to use them. Thanks for the diagrams and the measurements!
Jessica, I’m glad you like the design. You’ll have fun with them ! … Send me some pictures (TheKraftsman@KyserikeKraftsman.com) and I’ll post them to the website ..
Thank you so much, Great information… You keep writing and I’ll keep reading.
How long of a distance did you make the playing field? (how many feet from stake to stake?) I know the regulation is 48 ft, but yours looks like it may be shorter?
Cory, Thanks for visiting! The distance from stake to stake is 40 ft. This is the regulation court size.
the plans look great. I an planing on making a set or pits, if not two for my church as an eagle project. I would like to know,
1. about Who much did it cost for all the wood and sand.
2. What type of sand did you use?
Dylan, Thanks for your interest in the plans. Each one of the pits cost me roughly $100, but that was using all new pressure treated lumber. If you have any scraps around from a previous project that would certainly help to reduce the cost. Visit your local lumber yard and let them know what you are planning and maybe they would donate some of the supplies.
For the sand I just used bags of play sand. The same sand you would use in a sand box. Make sure to also build a cover for the pits to keep the local cats from using it as a litter box.
Good Luck with your project !
A friend of mine told me that there should not be anything in front of the pits. Have you had any trouble with the front side getting hit with the horseshoes? there will be kids also playing with it, would you advise not having it there? I would be able to redesign it with out it.
Does the wood take a beating form the horse shoes hitting them (platforms and front included)? Especially in my yard a lot of players are just playing for fun and do not have a great amount of experience?
Dylan and Jamie, The platform does take a beating when a wayward shoe misses the pit, but the decking material seems to hold up very well. If you stain the decking you will most certainly notice any damage done by a miss directed shoe. If you let the decking just season naturally it will be less noticeable.
The shoes may take a good bounce when they hit the decking. This is one reason why I created such a large backboard. Make sure your on-lookers and anyone throwing the shoes keeps a safe distance when they are on the receiving end.
what type of screws did you use?
Any type of screw that is rated for exterior use can be used. I used 2″ screws to attach the 5/4″ decking to the frame work and 3″ screws for the frame work.
Since all pitchers should pitch from 30 feet, why not make a shorter horseshoe pit?
Wood constructed backboards do not stand up well against the sun, rain, & hard horseshoes, is there a composite board that is superior to wood and will last forever?
Just want to say THANK YOU for this post!
Hi, i have been searching for a while and ths plan is the best I have seen so far. But in regards to the depth of the pit at 60″, isn’t the maximum depth 48″ as suggested by the NHPA? Whatever is best, but i would modify by adding a 2×6 at the 48″ mark. Thanks Jim
The depth of the “pit” area can be from 43″ to 72″ according to the NHPA specification. Certainly adding another 2×6 to define the depth that you want is an easy modification to make.
“The Pit – The pit is a rectangular area filled with the “pit substance” into which the shoes are pitched. The maximum inside length of the pit (in the direction in which the shoes are pitched) is seventy-two inches (72”) and the minimum inside length is forty-three inches. (43”) The maximum inside width is thirty-six inches (36”) and the minimum inside width is thirty-one inches (31”).”
was wondering what the benefits of cementing stake in 5 gallon bucket and burying the whole thing is? could stake just be pounded into ground then cement poured around it in the dirt?
That would work fine I’m sure, but it would probably be difficult to hold the stake at the correct angle while the cement dries.